Sculpting Joy: Your Guide To A Charming Polymer Clay Octopus
Have you ever looked at a piece of art and thought, "I could make that"? Well, when it comes to creating something truly unique, something with a bit of whimsical charm, a polymer clay octopus might be just the project for you. These delightful little creatures, with their many arms and expressive eyes, are actually a fantastic way to explore your creative side. It's almost like bringing a tiny piece of the ocean into your own home, you know, a very personal touch.
Working with polymer clay is, in a way, a very satisfying experience. This material, which is a type of synthetic polymer, allows for incredible detail and vibrant colors. You can shape it, mold it, and then, after a bit of baking, it hardens into a durable piece. It's quite a versatile medium, offering so much freedom for imagination, which is why it’s become a favorite for many crafters, you know, all around.
This guide will help you discover the simple steps to creating your very own polymer clay octopus, from gathering your basic tools to adding those tiny, lifelike touches. We'll also talk a little about what makes polymer clay so special, drawing on what we know about polymers themselves. So, let's get ready to make something wonderful today, perhaps a new little friend for your desk.
Table of Contents
- Why Polymer Clay for Octopus?
- Getting Started: Your Polymer Clay Octopus Toolkit
- Crafting Your Own Polymer Clay Octopus: A Step-by-Step Guide
- Creative Ideas for Your Polymer Clay Octopus
- Keeping Your Clay Octopus Looking Great
- Frequently Asked Questions About Polymer Clay Octopus
Why Polymer Clay for Octopus?
You might wonder, why polymer clay specifically for an octopus? Well, it's actually quite simple. Polymer clay is, in essence, a type of synthetic substance. It’s made up of very large molecules, which are, you know, multiples of simpler chemical units. These units are called monomers, and they link together in long, repeating chains. This structure gives polymers their unique characteristics, and that's why polymer clay behaves the way it does.
Because these molecules are bonded together in long, repeating chains, polymer clay has some truly useful properties for sculpting. It starts out soft and pliable, which is very helpful for shaping those intricate octopus arms and tiny details. Then, after baking at a relatively low temperature, it becomes quite firm and durable. This transformation, you see, is a direct result of the chemical changes happening within those long polymer chains, which is pretty neat.
Natural biopolymers, like DNA or proteins, are fundamental to biological structure and function, but polymer clay, as a synthetic plastic, offers a different kind of utility. It holds its shape well during the sculpting process, which is a big plus for something with so many delicate parts, like an octopus. Plus, the colors are very vibrant and don't fade much after baking. So, in some respects, it’s a really ideal material for this kind of detailed, colorful work.
Getting Started: Your Polymer Clay Octopus Toolkit
Before you even think about shaping your little sea friend, gathering your supplies is a good first step. You don't need a huge collection of fancy items, just a few key things to get you going. It's about having the right bits and pieces, you know, to make the process smoother. This way, you can focus on the fun part: the sculpting.
Essential Clay Colors
For a polymer clay octopus, you'll definitely want to pick out a main body color. Blues, purples, or even some reddish-browns are typically popular choices, as they mimic real octopus shades. Beyond that, a small amount of black and white clay will be very useful for making the eyes, which really bring your creation to life. You might also want a contrasting color for some spots or suction cups, just a little something extra.
It's a good idea to start with a few basic colors and then, you know, you can always expand your collection later. Some brands offer starter packs that have a nice variety, which is pretty convenient. Just make sure the clay is fresh and soft; old, hard clay can be a bit tricky to work with, to be honest.
Simple Sculpting Tools
You don't need a whole studio full of tools for your first polymer clay octopus. A few simple items will do the trick. A small craft knife or a blade is useful for cutting and shaping. A needle tool or a toothpick can help with making small holes or adding texture, like those little suction cups on the arms. You might also find a ball-tipped tool helpful for making eye sockets or smoothing surfaces. Really, your own fingers are some of the best tools you have, so don't forget that.
A smooth work surface is also pretty important. A ceramic tile, a glass mat, or even a piece of parchment paper will work well. This prevents the clay from sticking and keeps your workspace clean. And, you know, having a damp cloth nearby for wiping your hands is always a good idea, as clay can sometimes leave a bit of residue.
Baking Basics
Once your polymer clay octopus is all sculpted, it needs to be baked to harden. This is a very crucial step, and doing it correctly ensures your creation lasts. You'll need an oven, of course, and a baking sheet. A small oven thermometer is also incredibly helpful, as oven temperatures can sometimes vary quite a bit from what the dial says. This helps ensure you're baking at the right temperature for the right amount of time.
Each brand of polymer clay will have specific baking instructions, including temperature and time. It's really important to follow these guidelines closely. Baking too hot can burn your clay, making it brittle or discolored, while baking too cool might leave it soft and fragile. So, you know, paying attention to these details is pretty key for a good result.
Crafting Your Own Polymer Clay Octopus: A Step-by-Step Guide
Now for the fun part: actually making your polymer clay octopus! This process is all about building up shapes and adding details. Don't worry if your first one isn't perfect; that's part of the learning. You'll get better with each try, which is pretty much how things go with any new skill.
Shaping the Head and Body
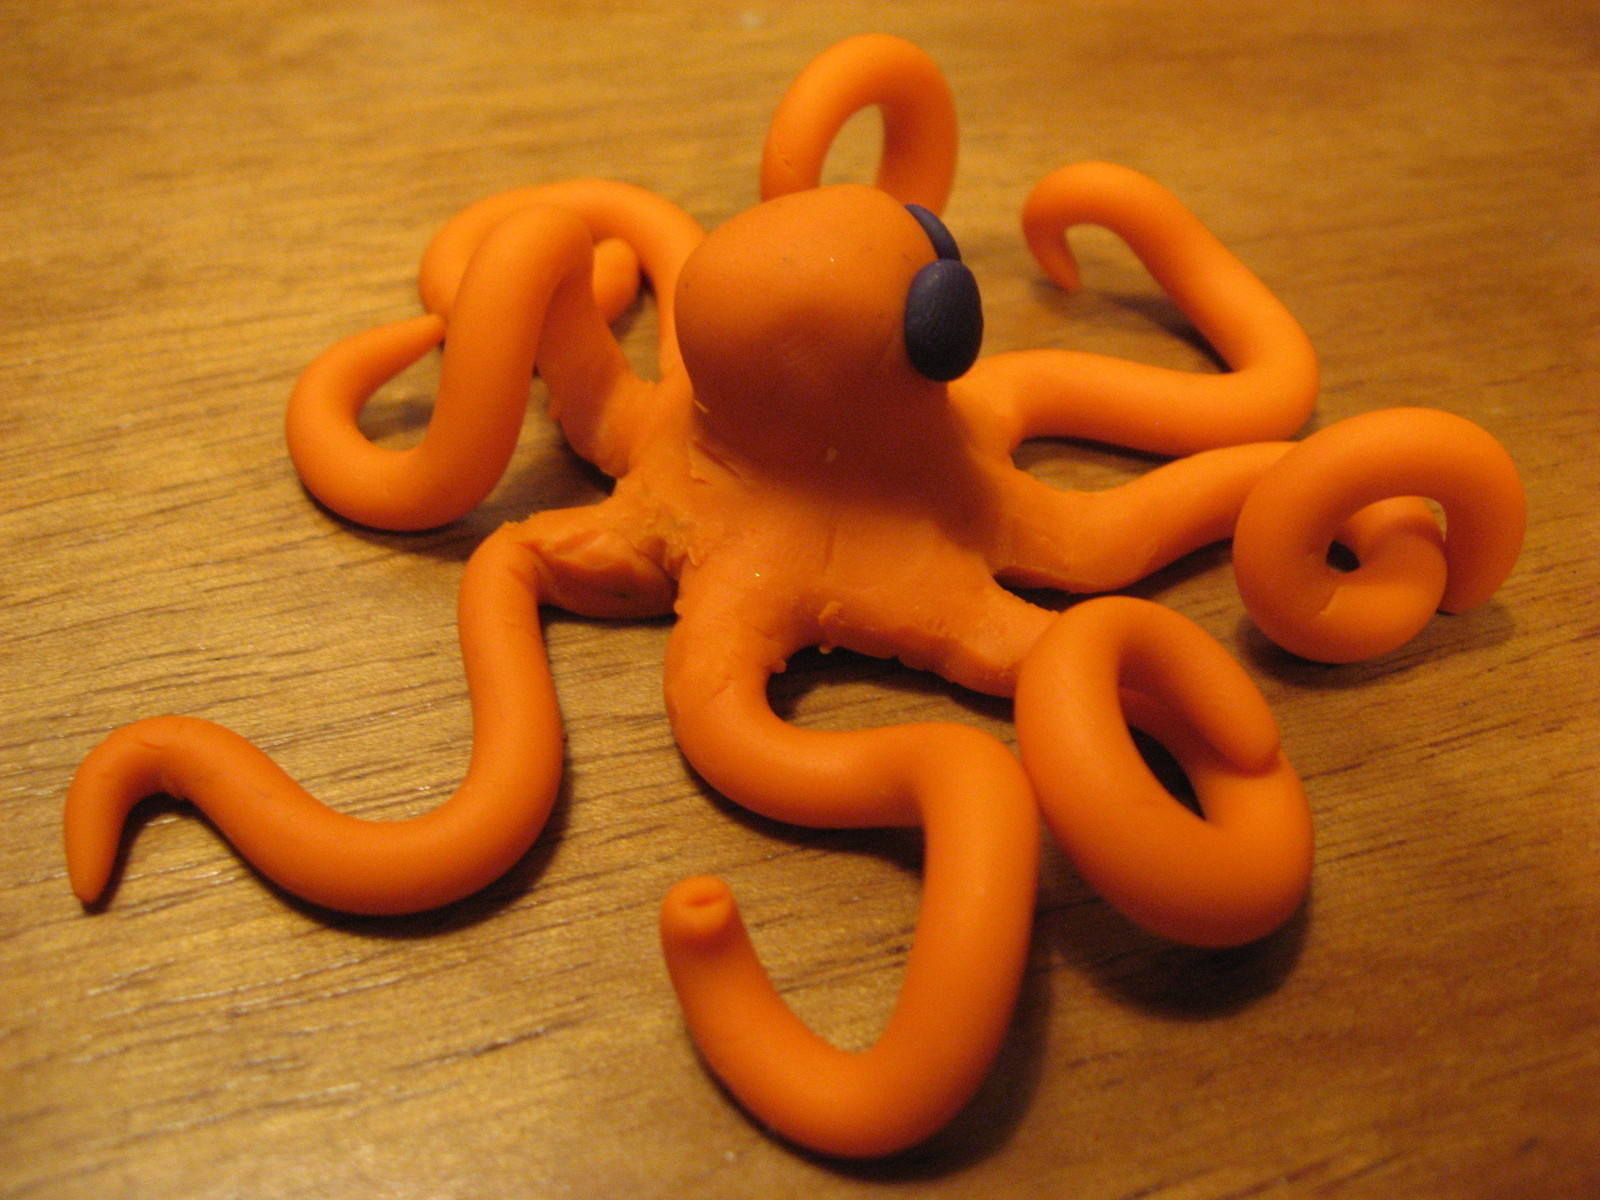
Start with a piece of your main clay color. You'll want to condition it first, which means warming it up and kneading it until it's soft and easy to work with. This makes it less crumbly and more pliable, like your text says, polymers are composed of many repeating subunits, and this conditioning helps them bond together properly when you're working with them. Then, roll it into a ball for the head. This ball will be the main part of your polymer clay octopus, so make it a good size.
Next, gently pull down a bit from the bottom of the ball to form the body, which will connect to the arms. You're basically creating a slightly rounded, pear-like shape. Think of it as the central anchor for all those wobbly arms. Make sure it's smooth and without cracks, as cracks can sometimes show up more after baking, which is something you want to avoid, you know.
Adding Those Wriggly Arms
An octopus, of course, needs eight arms! Take small, equal-sized pieces of clay for each arm. Roll each piece into a tapered snake shape, thinner at one end. These don't have to be perfectly identical, as real octopus arms have a bit of variation. Attach the thicker end of each arm to the underside of your octopus body, spacing them out evenly. Gently smooth the joins so they look like they're naturally part of the body, which is a nice touch.
Now, here's where the wriggly part comes in. You can carefully bend and curl each arm into different positions. Some can reach up, some can curl around, some can just rest. This gives your polymer clay octopus a lot of personality and movement. You can even add tiny, flat circles of clay for suction cups along the underside of the arms, using a needle tool to make a small indentation in each one. This adds a lot of visual interest, too, it's almost like giving it tiny hands.
Bringing it to Life: Eyes and Texture
The eyes are really important for giving your polymer clay octopus character. Take two tiny balls of black clay and press them gently onto the head where the eyes should be. Then, add an even tinier dot of white clay on each black eye for a highlight. This little white dot makes the eyes look shiny and alive, which is pretty amazing. You can also use a needle tool to create a slight texture on the head and body, maybe some tiny dots or lines, to mimic the skin of a real octopus.
You might also consider adding a small mouth, just a tiny slit, below the eyes. This can give your octopus a happy, surprised, or even a slightly mischievous expression. Think about the overall feeling you want your little creature to have. It's a bit like giving it a face, you know, a very important step.
The Baking Process
Once you're happy with your sculpted polymer clay octopus, it's time to bake it. Carefully place your octopus on a baking sheet lined with parchment paper. Preheat your oven to the temperature recommended by your specific clay brand. As I was saying, using an oven thermometer is really a good idea to ensure accuracy. Bake for the recommended time, which is usually between 15 to 30 minutes, depending on the size of your octopus and the clay brand.
After baking, turn off the oven and let your polymer clay octopus cool completely inside the oven. This helps it to harden gradually and prevents thermal shock, which could cause cracks. Once it's cool, it will be hard and ready for display! You can then, you know, add a coat of clear glaze for extra shine and protection, if you like. This step is pretty much the final touch.
Creative Ideas for Your Polymer Clay Octopus
Your finished polymer clay octopus doesn't just have to sit on a shelf. There are so many ways to use these charming creations! They can be functional, decorative, or just plain fun. It's really about letting your imagination go a little wild with them, you know.
Miniature Charms and Jewelry
If you make your polymer clay octopus on the smaller side, it can easily become a cute charm for a necklace, a bracelet, or even a keychain. Just remember to insert a small eye pin into the top of the head before baking. After baking, you can attach a jump ring and then, you know, connect it to your chosen jewelry finding. These make very personal gifts, or a nice little accessory for yourself.
Desk Buddies and Home Decor
A slightly larger polymer clay octopus can make a fantastic desk buddy, sitting cheerily beside your computer. They can also be incorporated into home decor. Imagine a small octopus peeking out from a potted plant or sitting on a bookshelf. They add a touch of whimsy to any space, which is really rather lovely. You could even make a few in different sizes and colors for a whole family of them, actually.
Storytelling Scenes
For those who love creating little worlds, your polymer clay octopus can be part of a larger scene. You could sculpt some tiny coral, a few little fish, or some rocks to create a miniature underwater diorama. These scenes can tell a story and are a wonderful way to showcase your sculpting skills. It's like building a tiny narrative, you know, right there on your table.
Keeping Your Clay Octopus Looking Great
Once your polymer clay octopus is baked and cooled, it's quite durable, but a little care can help it last even longer. Try to avoid extreme temperatures or direct sunlight for long periods, as these can sometimes affect the clay over time. If it gets dusty, a soft brush or a damp cloth can gently clean it. For more in-depth care tips, you might want to check a reputable craft supplier's site, like https://www.craftingsupplieshq.com, for general polymer clay care information.
If you've added any surface treatments, like paint or glaze, make sure they are fully cured before handling your octopus too much. This just ensures everything is set properly. With a little bit of gentle handling, your charming polymer clay octopus should bring you joy for a very long time, which is, you know, the whole point of making it.
Frequently Asked Questions About Polymer Clay Octopus
How do you make polymer clay octopus suction cups?
To make suction cups for your polymer clay octopus, you can roll tiny, tiny balls of clay, then flatten them slightly. Press these flat circles onto the underside of each arm. For a more realistic look, use a needle tool or a toothpick to make a small indentation in the center of each flattened circle. This gives them that classic suction cup appearance, which is pretty neat.
What tools do I need for polymer clay octopus?
For a polymer clay octopus, you'll mainly need your hands, a small craft knife or blade, and a needle tool or toothpick for details. A smooth work surface, like a ceramic tile, is also very helpful. You might also want a ball-tipped tool for smoothing or making eye sockets. Honestly, you don't need a lot of specialized equipment to get started, just a few basic items, you know, to help you along.
How long do you bake polymer clay octopus?
The baking time for your polymer clay octopus really depends on the brand of clay you're using and the thickness of your piece. Typically, it's baked at around 275°F (130°C) for 15 to 30 minutes. Always check the specific instructions on your clay packaging for the most accurate temperature and time. Using an oven thermometer is also a good idea to ensure your oven is at the correct temperature, which is very important for proper curing.
Bring Your Own Polymer Clay Octopus to Life
Creating a polymer clay octopus is a truly rewarding experience, offering a chance to express your unique artistic flair. From shaping those intricate arms to adding the final, expressive eyes, each step brings your little sea creature closer to life. It's a project that combines creativity with a bit of simple science, considering how the polymer material behaves, as we discussed. You can learn more about polymer clay techniques on our site, and perhaps even link to this page for more animal sculpting ideas.
So, why not gather your supplies today and begin sculpting your very own charming polymer clay octopus? The possibilities are pretty much endless, and the joy of creating something with your own hands is truly special. You might be surprised at what you can make, you know, with just a little bit of clay and imagination.

Polymer Clay Octopus Charm by PolymerClayMichelle on DeviantArt
Polymer Clay Octopus · 410 Gone
Awesome Polymer Clay Octopus! · A Clay Animal · Molding on Cut Out + Keep
