Sally Pumpkin Carving Stencil: Your Guide To A Spooky Masterpiece This Halloween
Halloween is a time for spooky fun, creative projects, and bringing beloved characters to life right on your porch. This year, why not make your pumpkin truly stand out with a Sally pumpkin carving stencil? It's a wonderful way to celebrate the season with a touch of classic movie magic. Just like you might seek out expert guidance for keeping your hair looking its absolute best, getting a great pumpkin carving means having the right plan.
There's something so special about seeing Jack Skellington's rag doll sweetheart, Sally, come to life as a glowing pumpkin. Her unique charm and stitched-up look make for a really interesting design, offering a chance to show off your artistic side. You know, making something beautiful, whether it's a stunning hairstyle or a carved pumpkin, often comes down to paying attention to the details and using good supplies.
Preparing for a successful carving experience is a bit like getting ready to create your most luxurious locks; it starts with good products and a clear vision. With the right sally pumpkin carving stencil and some helpful pointers, you can craft a pumpkin that will impress all your trick-or-treaters and neighbors. So, let's get ready to make some Halloween magic!
Table of Contents
- The Magic of Sally: A Beloved Character for Your Pumpkin
- Gathering Your Supplies: What You'll Need
- Finding Your Ideal Sally Pumpkin Carving Stencil
- Step-by-Step: Bringing Sally to Life on Your Pumpkin
- Lighting Up Your Sally Pumpkin
- Keeping Your Masterpiece Fresh
- Frequently Asked Questions About Sally Pumpkin Carving
The Magic of Sally: A Beloved Character for Your Pumpkin
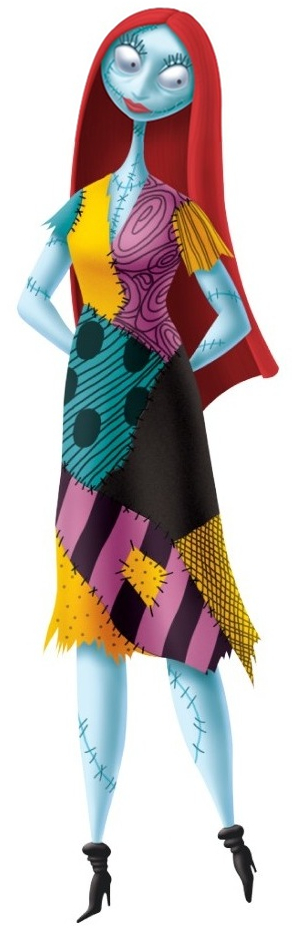
Sally, from Tim Burton's "The Nightmare Before Christmas," is a character who has really captured hearts over the years. She's a kind and clever rag doll, stitched together by Dr. Finkelstein, and she longs for freedom and a true connection. Her gentle spirit and unique appearance make her a favorite for many, especially when Halloween comes around, so she's a pretty natural fit for a pumpkin.
Who is Sally? A Quick Look
Sally is the deuteragonist of "The Nightmare Before Christmas," and she's a very special creation. She often has visions of the future and tries to warn Jack about his misguided Christmas plans. Her distinctive look, with her stitches, long red hair, and patchwork dress, makes her instantly recognizable. You know, she's got a quiet strength about her, which is quite admirable.
| Attribute | Detail |
|---|---|
| Origin | "The Nightmare Before Christmas" |
| Creator | Dr. Finkelstein |
| Species | Rag Doll (Living) |
| Key Traits | Kind, Intelligent, Resourceful, Loyal |
| Appearance | Patchwork skin, long red hair, stitched mouth |
Why Sally is a Perfect Pumpkin Choice
Sally's distinct features, like her stitched mouth and big, expressive eyes, lend themselves really well to pumpkin carving. Her design offers a lot of room for creativity, whether you want to go for a simple outline or add more detailed shading. It's almost like she was made to be a pumpkin, don't you think? Plus, she fits the spooky-but-sweet vibe of Halloween perfectly, giving your display a bit of personality.
Gathering Your Supplies: What You'll Need
Before you get started with your sally pumpkin carving stencil, it's a good idea to gather everything you'll need. Having your tools and materials ready will make the whole process smoother and more enjoyable. Think of it like getting all your salon professional hair styling products together before you start on a new look; preparation truly makes a difference.
Choosing the Right Pumpkin
Selecting the perfect pumpkin is the first step to a successful Sally creation. Look for one that's firm, has a smooth surface, and is free of any soft spots or blemishes. A flatter side might be good for your stencil placement, as a matter of fact. Also, consider the size; a medium to large pumpkin will give you enough space to work with the details of your sally pumpkin carving stencil without feeling too cramped.
Essential Carving Tools
Having the right tools can really change your carving experience. While a basic kitchen knife can work, a specialized pumpkin carving kit usually has smaller, sharper tools that are much better for details. You'll want a good scoop for cleaning out the inside, a sturdy saw for cutting the lid, and smaller knives or etching tools for the stencil work. Sometimes, a drill with a small bit can help with tiny holes or eyes, too.
- Pumpkin scooper or large spoon
- Sturdy serrated knife (for the lid)
- Small carving saws (from a kit)
- Detail carving tools or etching tools
- Push pins or a tracing wheel
- Painter's tape or masking tape
- A bowl for seeds and pulp
- Paper towels for cleanup
- A damp cloth
- Gloves (optional, for mess)
- A bright light source (for tracing)
Finding Your Ideal Sally Pumpkin Carving Stencil
The heart of your project is finding the perfect sally pumpkin carving stencil. There are many options out there, from simple outlines to more complex designs that capture her unique stitched look. Picking the right one for your skill level is pretty important, you know, to make sure you have fun and get a result you're happy with.
Where to Look for Stencils
The internet is your best friend when searching for a sally pumpkin carving stencil. Many websites offer free printable stencils, and you can also find paid options that might have more intricate designs or multiple variations. Art and craft blogs, fan communities, and even official movie merchandise sites might have something just right. Just make sure to pick one that looks clear and easy to follow, as a matter of fact.
- Online search engines (Google Images, Pinterest)
- Specialized pumpkin carving websites
- Craft and DIY blogs
- Fan art communities
- Printable stencil collections
Tips for Printing and Preparing Your Stencil
Once you've chosen your sally pumpkin carving stencil, printing it correctly is the next step. Make sure it's scaled to fit your pumpkin's size. You might need to print it on multiple pages and tape them together for a larger design. Using regular printer paper is fine, but some people prefer slightly thicker paper or even cardstock for more durability. You'll want to cut out any large white spaces around the design, which helps it lay flat on the pumpkin's curve, too.
When you're ready to attach the stencil, painter's tape works really well because it holds the paper in place without damaging the pumpkin's skin. Try to smooth out any wrinkles or bubbles as much as possible, especially around the areas you'll be tracing or carving. This little bit of effort here can really make a difference in how your design turns out, you know.
Step-by-Step: Bringing Sally to Life on Your Pumpkin
Now for the fun part: bringing your sally pumpkin carving stencil to life! This process involves a few key stages, from getting the pumpkin ready to carefully carving out Sally's distinctive features. Taking your time with each step will help you achieve a truly impressive result, so just relax and enjoy the creative flow.
Preparing Your Pumpkin
Start by cutting a lid from the top or bottom of your pumpkin. A common practice is to cut a circle around the stem, angling your knife inwards to create a ledge for the lid to rest on. If you cut from the bottom, it makes for a cleaner look when displayed, as the lid is hidden. Once the lid is off, use your scooper to remove all the seeds and stringy pulp. Scrape the inside walls until they are relatively smooth and about an inch thick, which makes carving easier. This thorough cleaning is a bit like prepping your hair for a new style; it sets the foundation for a good outcome.
Transferring the Stencil
With your pumpkin clean, it's time to transfer your sally pumpkin carving stencil. Tape the stencil securely to the smoothest part of your pumpkin. Use push pins or a tracing wheel to poke small holes along all the lines of the stencil. Make sure your holes are close enough together that they form a clear outline, but not so close that they tear the paper. Once you've traced the entire design, carefully remove the paper stencil. You should see a dotted outline of Sally on your pumpkin. Sometimes, a light marker can connect the dots if they're hard to see, you know.
The Art of Carving Sally's Features
Now, with your dotted outline, you can start carving. Begin with the smaller, more delicate areas first, like Sally's eyes or her signature stitches. Use your small carving saws for cutting through the pumpkin wall. For areas that are meant to be etched or scraped (not cut all the way through), use your detail tools. This might be for her hair strands or the subtle shading around her face. Take it slow, and don't rush. This is where patience really pays off, similar to how careful application of hair color or nail products gives you the best finish.
Adding Depth and Detail
Sally's charm often comes from her unique texture and patchwork appearance. To add depth, you can use etching tools to scrape away just the outer layer of the pumpkin skin, rather than cutting all the way through. This creates areas that will glow faintly when lit, adding a lovely dimension to her face and clothing details. You could even use a small, pointed tool to create tiny holes for her stitches, making them look more authentic. It's really about bringing out those subtle touches, just like how expert hair care helps bring out your most luxurious locks yet.
Lighting Up Your Sally Pumpkin
Once your sally pumpkin carving stencil creation is complete, the right lighting can truly make it shine. The way you light your pumpkin can change its whole mood, making Sally look either sweetly melancholic or wonderfully eerie. It's like choosing the perfect finish for your nails; the right touch makes all the difference.
Best Lighting Options
Traditional candles are a classic choice, offering a warm, flickering glow. However, LED lights are a safer and often brighter option, especially if you plan to display your pumpkin for several nights. Battery-operated LED tea lights or puck lights work very well and come in various colors, so you could even give Sally a slightly blue or green glow for a different effect. Some people use small strings of fairy lights inside for a more even distribution of light, too. This allows you to really show off all your carving work.
- Traditional wax candles (use caution)
- Battery-operated LED tea lights
- Small LED puck lights
- Mini LED string lights
- Color-changing LED lights (for a fun twist)
Safety First with Lights
If you choose to use real candles, always place your pumpkin on a flat, stable surface away from anything flammable. Never leave a lit pumpkin unattended. LED lights are much safer, as they don't produce heat and eliminate the fire risk. This is a pretty important consideration, especially if you have pets or small children around. It's always good to be mindful of safety, you know.
Keeping Your Masterpiece Fresh
After all your hard work bringing your sally pumpkin carving stencil to life, you'll want to keep it looking good for as long as possible. Pumpkins, sadly, don't last forever, but there are some things you can do to extend their spooky lifespan. It's a bit like maintaining gorgeous, healthy hair; a little care goes a long way.
Tips for Preservation
To help your carved pumpkin last longer, you can mist it daily with water, especially the cut edges. Some people apply a thin layer of petroleum jelly to the carved surfaces to seal in moisture. You can also spray it with a diluted bleach solution (one teaspoon of bleach per quart of water) to slow down mold growth. Storing your pumpkin in a cool, shaded spot, or even in the refrigerator overnight, can really help it stay fresh. Frankly, keeping it out of direct sunlight and extreme temperatures is key.
Displaying Your Sally Pumpkin
When it comes to showing off your Sally pumpkin, choose a spot where it will be seen and admired. A porch, a window sill, or even a tabletop inside your home can be perfect. Make sure it's on a stable surface and out of the way of foot traffic. Consider placing it alongside other Halloween decorations or a spooky backdrop to create a full scene. The goal is to make your Sally pumpkin the star of your Halloween display, really.
Frequently Asked Questions About Sally Pumpkin Carving
Many people have questions when they're planning to carve a pumpkin, especially with a specific design like a sally pumpkin carving stencil. Here are some common queries that might pop up, along with some helpful answers. It's good to get these things sorted out before you begin, as a matter of fact.
How do you make a Sally pumpkin?
Making a Sally pumpkin involves selecting a good pumpkin, cleaning out the inside, securely taping a Sally pumpkin carving stencil to its surface, and then using push pins or a tracing wheel to transfer the design. After that, you carefully carve or etch the design using specialized pumpkin carving tools. Finally, you light it from within. It's a pretty straightforward process once you have all your supplies and the right stencil.
What do I need to carve a Sally pumpkin?
To carve a Sally pumpkin, you'll need a pumpkin, a Sally pumpkin carving stencil, a pumpkin scooper, a sturdy knife for the lid, small carving saws, detail carving tools or etching tools, push pins or a tracing wheel, and painter's tape. You might also want a damp cloth for cleanup and a light source for displaying your finished work. Having everything ready beforehand makes the whole experience much smoother, you know.
Are there free Sally pumpkin stencils available?
Yes, there are many free Sally pumpkin stencils available online. A quick search on popular image sites or craft blogs will often bring up several options. You can usually print these at home and adjust their size to fit your pumpkin. Just make sure to check the source to ensure it's a reputable site for printables. It's a good way to get started without spending extra money, honestly.
Sally - The Nightmare Before Christmas Wiki

Sally Ride - Wikipedia
Sally Redesign Rafa Knight
