Effortless Art: Your Guide To A Simple Chair Drawing
Have you ever felt like drawing, but then a blank page just stares back, making you wonder where to even begin? It's a pretty common feeling, you know. Sometimes, the idea of creating something on paper can feel a bit big, like there's so much to learn all at once. But what if we told you that getting started, especially with something like a simple chair drawing, is much more approachable than you might think? It really is, and it can be a rather calming way to spend some time, too.
You see, the word "simple" sometimes gets mixed up with "easy," but they're not quite the same, are they? As a matter of fact, "simple" often means something is clear, without a lot of extra bits, or just straightforward in its design. It's not about being less skilled; it's about focusing on the core idea, which is a pretty cool way to look at things, honestly. A simple chair drawing is about capturing the basic form, the very essence of a chair, without getting caught up in every little curve or shadow. It's about finding that clear, uncomplicated path to putting something on paper.
This article is going to show you how to do just that. We'll walk through the steps for creating a simple chair drawing, breaking it down into small, manageable parts. You'll discover why starting with basic shapes can make a big difference, and we'll even talk about some common questions people have when they're just getting started. By the end, you'll feel more confident picking up a pencil, and perhaps, you'll have a nice little chair sketch to show for your efforts, too. So, let's get going, shall we?
Table of Contents
- What Makes a Chair Drawing "Simple"?
- Why Try Drawing a Simple Chair?
- Tools You Might Want to Use
- Getting Started: Basic Shapes
- Step-by-Step: Drawing a Simple Chair
- Tips for Making Your Chair Drawings Even Better
- Common Questions About Simple Chair Drawing
- Embracing Your Creative Side
What Makes a Chair Drawing "Simple"?
When we talk about a simple chair drawing, we're really focusing on the idea of uncomplicated forms. It's about getting the basic shape of a chair down without getting caught up in all the intricate bits. Think about it this way: a simple drawing is often about being "朴素的," or plain and pure, rather than "笨的," or clumsy, as some might mistakenly think. It’s about clarity, not a lack of skill, you know? This approach lets you capture the main idea of an object quickly.
A simple drawing usually means using fewer lines and focusing on the overall outline. You don't need to worry about wood grain, fabric textures, or the exact way light hits the surface. Instead, you're just looking to create a recognizable shape that says "chair." It’s a bit like sketching a quick note to yourself, like those simple sticky notes people use for reminders; it gets the message across without a lot of fuss, which is pretty neat.
This kind of drawing is really good for anyone who feels a bit intimidated by art. It helps build confidence because you can see results rather quickly. You're learning to see objects in terms of their most basic components, which is a fundamental skill for any kind of drawing. So, a simple chair drawing is less about being "easy" in the sense of no effort, and more about being "simple" in its straightforward method and clear visual message, which is quite important.
Why Try Drawing a Simple Chair?
There are quite a few good reasons to give a simple chair drawing a try, honestly. For one thing, it's a fantastic way to just relax and unwind. Picking up a pencil and letting your hand move across the paper can be very calming, a bit like a quiet moment to yourself. You don't need any special talent or years of practice to enjoy it; you just need a willingness to try, which is pretty much all it takes.
Another reason is that it helps you build foundational drawing skills. Every artist, no matter how good they are, started with basic shapes and understanding how things fit together. A chair, with its straight lines and clear angles, is a perfect subject for practicing perspective and proportion. It helps you train your eye to see objects in terms of simple forms, and that's a skill you can use for drawing almost anything else, too. It’s a really practical exercise, actually.
Plus, getting a simple chair drawing done gives you a quick win, and that feels pretty good. It boosts your confidence and makes you feel like you can indeed create something. This little success can then encourage you to try drawing other things, maybe a simple table, or even a basic house. It's a small step that can lead to a much bigger creative journey, you know? It’s a very positive experience overall.
Tools You Might Want to Use
The beauty of a simple chair drawing is that you really don't need a whole lot of fancy art supplies. You can get started with just a few basic items you probably already have lying around. It's not about having the most expensive stuff; it's about making use of what's available to you, which is quite liberating, in a way.
First off, a pencil is pretty much essential. A regular graphite pencil, like a standard HB, works just fine. You don't need a whole set of different lead hardnesses for this. Just one good pencil will let you sketch out your lines and make any adjustments you need. It’s a very versatile tool, after all.
Next, you'll want some paper. Any kind of paper will do, really. Printer paper, a sketchbook, or even the back of an envelope can work for a quick practice session. The idea is just to have a surface to draw on. Don't feel like you need special art paper; just use what feels comfortable to you, and what you have handy, of course.
Finally, an eraser can be a helpful friend. Mistakes happen, and that's perfectly okay. An eraser lets you clean up lines or make changes without starting all over again. It’s a tool for refining your work, not for erasing failure, you know? So, with just these three simple things, you are pretty much ready to start drawing your chair, which is rather nice.
Getting Started: Basic Shapes
Before you even think about drawing a chair, it's really helpful to think about what basic shapes make up a chair. Pretty much everything we see can be broken down into simpler forms like squares, rectangles, circles, and triangles. A chair, in particular, is often made up of lots of rectangular shapes, which is kind of cool when you think about it.
Imagine a chair's seat. It's basically a flat rectangle, isn't it? And the backrest? Another rectangle, usually standing upright. The legs are typically long, thin rectangles or cylinders. By seeing these basic forms, you can start to sketch them out without worrying about the whole chair at once. It’s a way of simplifying the problem, much like simplifying a complex idea into a few core points, which can be very helpful.
This approach is often called "drawing through" or using "construction lines." You're essentially building your drawing out of these simple geometric shapes first. These initial lines are light, just guides, so you can easily adjust them later. It's like building a framework before you put up the walls, you know? This method really helps with getting the proportions right and making sure everything lines up properly. It’s a very smart way to begin any drawing, honestly.
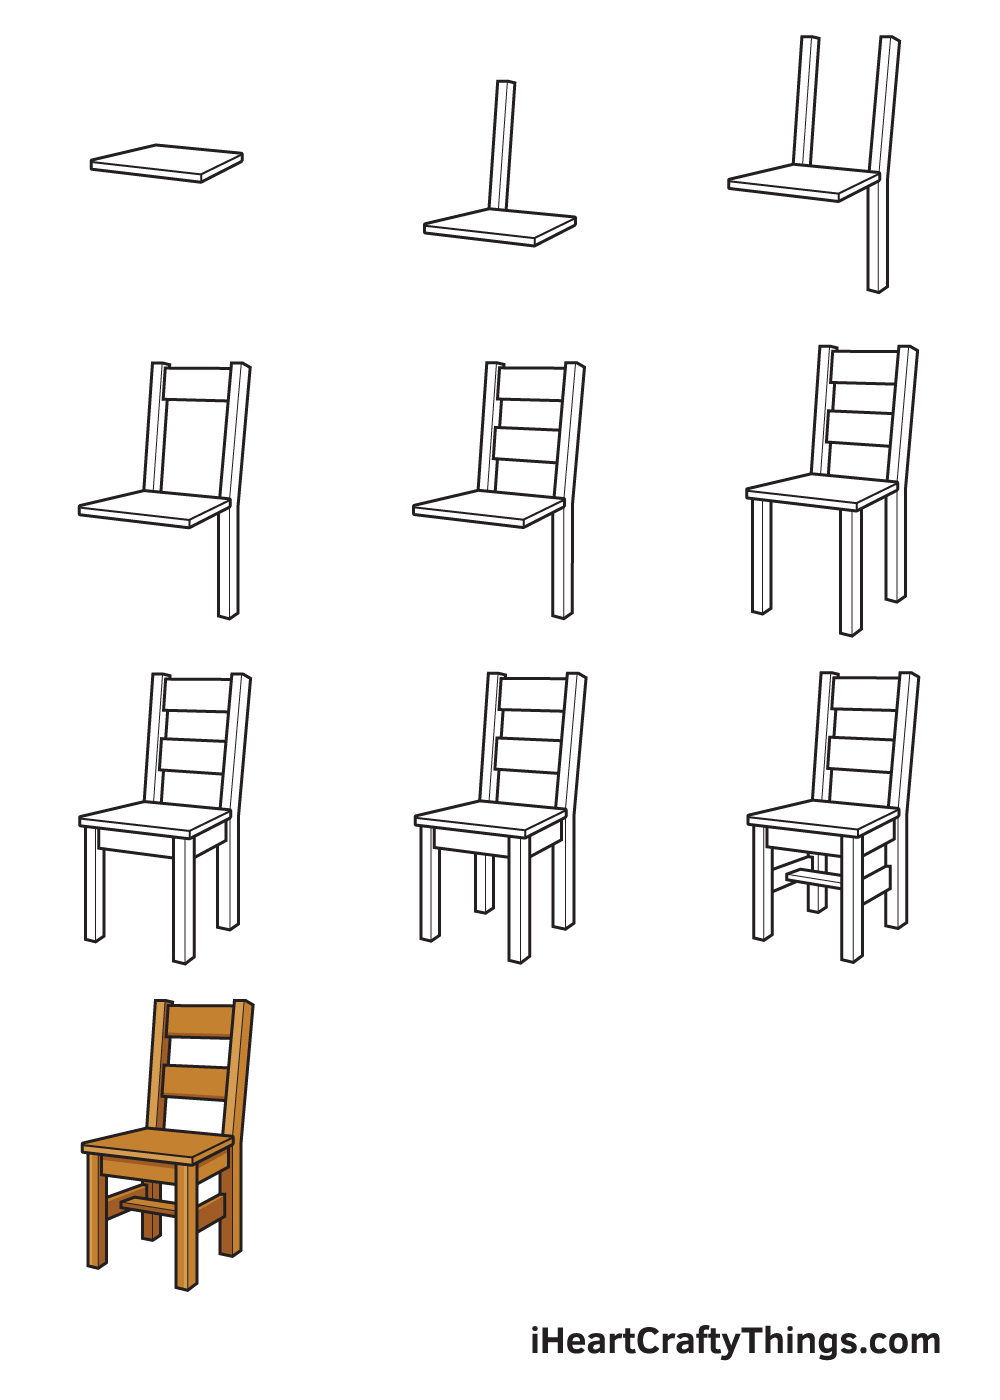
The Foundation: A Basic Box
Let's begin our simple chair drawing by creating the seat. This is arguably the most important part, as everything else will connect to it. Start by drawing a simple rectangle on your paper. This rectangle will represent the top surface of your chair's seat. Don't press too hard with your pencil; these are just guide lines for now, so you want them light enough to be easily erased later, if needed.
Now, to give this rectangle some depth, draw another identical rectangle slightly above and to the right (or left, depending on your preferred angle) of your first one. Then, connect the corners of the first rectangle to the corresponding corners of the second rectangle with straight lines. You've just created a basic three-dimensional box, which is pretty much the foundation for your chair's seat. This box will help you visualize the chair in space, which is a big step, actually.
Think of this box as the main block of wood or cushion that makes up the seat. It doesn't have to be perfect; just aim for something that looks like a solid, rectangular form. This initial step sets the stage for everything else, so take your time with it. It’s a very good starting point for getting the overall shape right, you know?
Adding the Backrest
With your seat box in place, it's time to add the backrest. This part is also pretty straightforward. From the back edge of your seat box, draw two vertical lines going upwards. These lines will form the sides of your backrest. Make them roughly the same height, and make sure they are parallel to each other. It's a bit like adding two tall posts to the back of your seat, you see.
Next, connect the tops of these two vertical lines with a horizontal line. This creates the top edge of your backrest. You now have a flat, rectangular shape extending upwards from the back of your chair's seat. If you want, you can give the backrest a little bit of thickness by drawing another set of lines slightly behind the first, just like you did for the seat, connecting the corners. This gives it a bit more solidity, which is kind of nice.
Remember, we're going for a simple chair drawing, so don't feel like you need to add any fancy curves or details to the backrest just yet. A plain, rectangular back is perfectly fine and fits the "simple" idea. This step really helps define the chair's purpose, you know? It makes it look like something you could actually sit on, which is the whole point, after all.
Putting in the Legs
Now, let's give our chair something to stand on: the legs. This part might seem a little tricky because of perspective, but we'll keep it simple. From each of the four bottom corners of your seat box, draw a vertical line going downwards. These lines will be the inner edges of your chair's legs. Try to make them all roughly the same length, which is pretty important for a stable-looking chair.
To give the legs some thickness, draw another parallel line next to each of your first vertical lines. Then, connect the bottoms of these parallel lines with a short horizontal line. This creates a rectangular shape for each leg. The legs closest to you will appear longer and more defined, while the ones further away might seem a bit shorter due to perspective, but for a simple drawing, just try to keep them visually balanced, you know?
Make sure the legs look like they are firmly planted on the ground, or at least heading in that direction. Avoid making them look like they are floating. This step really grounds your chair in the drawing space, giving it a solid feel. It’s a very important part of making your chair look functional, actually.
Giving it Some Depth
To make your simple chair drawing look a bit more realistic, even without a lot of detail, we can add a touch of depth. This involves thinking about how light might hit the chair and where shadows might naturally fall. You don't need to be an expert in shading; just a little bit can go a long way, you know?
Pick a side of your chair, say the right side. Lightly shade the surfaces that would naturally be in shadow if light were coming from the left. This might be the underside of the seat, the inner sides of the legs, or the back of the backrest. Use a consistent, light pressure with your pencil to create a soft, even tone. It’s not about making it dark, but about creating a subtle difference in value, which is pretty cool.
You could also add a very light shadow on the ground directly beneath the chair. This helps anchor the chair to the surface it's sitting on and makes it look less like it's floating in mid-air. A simple, soft smudge with your finger can even create a nice, diffused shadow effect. This bit of depth really makes the chair pop off the page a little, which is rather satisfying.
Final Touches and Details
Now that you have the basic form of your simple chair drawing, it's time for some very light final touches. Remember, we're keeping it simple, so don't go overboard with intricate patterns or textures. The idea is to refine what's already there, not to add a lot of new stuff, you know?
Go over your main lines with a slightly firmer hand to make them stand out a bit more. This helps define the edges of your chair and makes it look cleaner. You can also gently erase any construction lines that are still too visible. It's about tidying up the drawing and making the important parts clear, which is a good habit to get into, actually.
If you want to add just a tiny bit of character, you could slightly round the corners of the seat or backrest, or add a very small curve to the top of the backrest. These are just little hints of detail, not full-blown design elements. The goal is to make it look like a chair, and these small adjustments can help achieve that without making it complex. It’s a very satisfying part of the process, really, seeing your drawing come to life with just a few strokes.
Tips for Making Your Chair Drawings Even Better
Once you've tried drawing a simple chair a few times, you might want to try some things to make your drawings even more interesting. It's all about playing around and seeing what works for you, which is a pretty fun way to learn, honestly. Don't feel pressured to make every drawing perfect; each one is a step in your learning process, you know?
One good tip is to try drawing chairs from different angles. Instead of always looking at it straight on, try drawing it from a slightly higher or lower viewpoint, or from the side. This helps you understand how objects look in three dimensions and how perspective changes their appearance. It’s a bit of a challenge, but a rewarding one, actually.
Another thing you can do is observe real chairs around you. Look at the chairs in your home, at a coffee shop, or in pictures. Notice their basic shapes. Are they mostly rectangular, or do they have more curves? How do the legs connect to the seat? You don't need to draw them; just observing helps train your eye, which is very important for any kind of art. It’s a way of collecting visual information, you see, without even picking up a pencil.
And finally, don't be afraid to experiment with different types of "simple" chairs. A stool is a simple chair, a bench is a simple chair, even a basic office chair can be simplified. Each one offers a slightly different set of shapes to work with, keeping things fresh and interesting. Just keep practicing, and you'll see how much you improve over time, which is pretty amazing.
Common Questions About Simple Chair Drawing
How do I make my chair drawing look less flat?
To make your chair drawing look less flat, try adding some depth with simple shading. Pick a light source, like from the top left, and then lightly shade the areas that would naturally be in shadow, like the undersides of the seat and the inner sides of the legs. Also, drawing the back corners of the seat and legs slightly shorter than the front ones helps create the illusion of three dimensions. This really helps it pop, you know?
What if my lines aren't perfectly straight?
It's totally okay if your lines aren't perfectly straight, honestly. For a simple chair drawing, the goal is not machine-like precision but getting the general form across. Even experienced artists often use slightly wobbly lines for a more natural, hand-drawn feel. Just keep practicing, and your hand will get steadier over time. What matters most is that you're trying and enjoying the process, which is pretty much the main thing.
Can I use a ruler for a simple chair drawing?
Yes, you absolutely can use a ruler for a simple chair drawing if you want perfectly straight lines. There's nothing wrong with using tools to help you achieve the look you're going for. However, try to also practice drawing straight lines freehand sometimes, as that helps build your drawing confidence and control. It's really up to you and what makes you feel most comfortable while you're creating, you see. For more drawing tips, learn more about on our site, and check out this page for other creative ideas.
Embracing Your Creative Side
Drawing a simple chair is just one small step into the big world of putting your ideas on paper. It's about seeing that art doesn't have to be intimidating or overly complicated to be enjoyable and rewarding. The whole point is to have fun with it, to express yourself, and to just make something, which is a pretty wonderful thing, honestly. Remember, every line you draw is a step forward, a bit of practice that helps you grow.
So, why not grab a pencil and some paper right now? Give a simple chair drawing a try. Don't worry about it being perfect; just enjoy the act of creating. You might be surprised at what you can do, and how relaxing it feels. It’s a very accessible way to tap into your own creative energy, you know? Just start sketching, and see where your imagination takes you.
And who knows, maybe this simple chair drawing will be the start of a whole new hobby for you. There are so many things you can learn and create, and it all begins with taking that first, simple step. You could even look up more about basic drawing techniques online, perhaps a resource like this Art-Is-Fun guide on drawing a chair, for some extra ideas. Just keep exploring, and enjoy the process, which is really what it's all about.
Chair Drawing — How To Draw A Chair Step By Step

Chair Drawing — How To Draw A Chair Step By Step

Chair Drawing (easy) - HelloArtsy
