Growing Your Own Planta De Esparragos: A Garden Adventure For Fresh Flavors
Thinking about adding something truly special to your home garden this year? Maybe you're looking for a vegetable that keeps giving back, year after year. Well, you're in for a treat because the planta de esparragos, or asparagus plant, is honestly a fantastic choice for many home growers. It's a bit of a long-term commitment, sure, but the rewards are incredibly worth it, providing those tender, delicious spears right from your own patch. We're talking about a perennial favorite that, with just a little patience, offers a harvest unlike anything you can pick up at the store.
There's something uniquely satisfying, you know, about stepping out into your garden and gathering fresh produce that you've nurtured yourself. Asparagus, in particular, has this very elegant appeal, and it's surprisingly resilient once it gets settled in. As we look toward the warmer months of 2024, more and more people are finding joy in cultivating their own food, and this beautiful plant, the planta de esparragos, fits right into that growing trend of self-sufficiency and fresh eating. It’s a wonderful way, really, to connect with nature and enjoy truly seasonal ingredients.
So, if you've ever dreamt of having a steady supply of those green spears for your spring and early summer meals, or perhaps you're just curious about what it takes to grow this particular crop, you've definitely come to the right place. We're going to walk through everything you need to know about getting your asparagus patch going, from picking the perfect spot to enjoying your very first harvest. It’s pretty exciting, actually, to think about all the delicious possibilities, and we'll even touch on some great ways to keep your plants happy and productive for years to come. You know, like your own little food factory.
Table of Contents
- Why Grow Asparagus? The Allure of Planta de Esparragos
- Picking the Perfect Spot for Your Asparagus
- Getting Started: Crowns Versus Seeds
- The Planting Process: Laying the Foundation
- First Year Care: Nurturing Your Young Planta de Esparragos
- Ongoing Care for Established Asparagus Beds
- Winter Preparation for Your Asparagus Patch
- The Harvesting Joy: When and How to Pick
- Storing Your Fresh Asparagus
- Troubleshooting Common Asparagus Issues
- Frequently Asked Questions About Planta de Esparragos
- Your Asparagus Journey Begins!
Why Grow Asparagus? The Allure of Planta de Esparragos
So, why would anyone choose to dedicate a piece of their garden to the planta de esparragos, especially when it takes a little while to get going? Well, frankly, the reasons are pretty compelling. First off, the taste of freshly picked asparagus is simply unparalleled. It’s crisp, sweet, and has a delicate flavor that you just don't get from store-bought spears that have traveled many miles. This is, you know, a very different experience.
Then there’s the fact that asparagus is a perennial vegetable. This means that once you plant it, it comes back year after year, sometimes for 15 to 20 years or even longer! That’s pretty amazing, actually. You do the hard work upfront, and then you get to enjoy harvests for a very long time, which is quite a sustainable way to garden, in a way. It’s like a long-term investment in your kitchen.
Also, asparagus is incredibly healthy. It’s packed with vitamins, minerals, and antioxidants. It's low in calories and a good source of fiber, too. Having it readily available in your backyard means you’re more likely to incorporate this nutritious vegetable into your meals, which is definitely a good thing for your overall well-being. It's a pretty smart choice for healthy eating.
Picking the Perfect Spot for Your Asparagus
Choosing the right location for your planta de esparragos is, honestly, one of the most important steps. Remember, these plants are going to be there for a very long time, so you want to get it right from the start. Think of it like picking a spot for a new family member who plans to stay for decades. It needs to be a place where they can really thrive, you know?
Sunlight Needs
Asparagus plants absolutely love sunshine. They need at least six to eight hours of direct sunlight every single day to produce strong, healthy spears. So, when you’re scouting out a spot, look for an area in your garden that gets plenty of bright, unfiltered light throughout the day. A place that’s shaded for part of the day, particularly during the peak afternoon hours, probably won't give you the best results. It’s pretty straightforward, really: more sun equals more spears.
It's also a good idea to pick a spot where the asparagus won’t be shaded by other taller plants as they grow. You want to make sure they get all the light they can possibly soak up. Consider how tall nearby trees or shrubs might grow over the years, and plan accordingly. This is, you know, a long-term view.
Soil is Key: Preparing the Ground
The soil where you plant your asparagus is, arguably, just as important as the sunlight. Asparagus plants prefer soil that drains very well. They really don't like having "wet feet," which means their roots sitting in soggy soil. This can lead to root rot and other problems. So, if you have heavy clay soil, you'll definitely need to amend it quite a bit.
To prepare the soil, you'll want to dig down a good foot or so and mix in plenty of organic matter. Things like compost, well-rotted manure, or even some aged sawdust can work wonders. This helps to improve drainage and also adds valuable nutrients to the soil, which the asparagus plants will absolutely appreciate. They are, after all, pretty hungry feeders. You want a soil that’s rich and crumbly, almost like a perfect cake mix, but for plants.
A soil pH between 6.5 and 7.0 is generally considered ideal for asparagus. You might want to get a soil test done to figure out your current pH and nutrient levels. This way, you can adjust the soil precisely to give your planta de esparragos the best possible start. It’s a bit of extra effort upfront, but it pays off big time in the long run, seriously.
Getting Started: Crowns Versus Seeds
When you decide to grow asparagus, you basically have two main options for starting your plants: you can use asparagus crowns or you can plant asparagus seeds. Both methods have their good points and some things to consider, so it's worth thinking about which one fits your patience level and your garden plans, you know, just a little.
Asparagus Crowns: The Quicker Start
Most home gardeners, particularly those just beginning with asparagus, choose to plant one-year-old asparagus crowns. These crowns are essentially dormant root systems that have already gone through their first year of growth. They look a bit like an octopus with a central bud and roots spreading out, which is pretty cool. The big advantage here is that they give you a head start, so you can usually expect your first small harvest a year sooner than if you started from seed.
Crowns are typically available in early spring at garden centers or through online nurseries. When you get them, you want to plant them as soon as possible. If you can't plant them right away, keep them cool and slightly moist. Good quality crowns will be firm and healthy-looking, without any signs of mold or rot. This is, in fact, very important for a strong start.
Some popular varieties for crowns include 'Mary Washington,' 'Jersey Knight,' and 'Purple Passion.' Each has slightly different characteristics, like spear thickness or color, so you might want to do a little research to pick one that sounds appealing to you. 'Jersey Knight,' for instance, is known for being very productive and disease-resistant, which is quite nice.
Asparagus Seeds: A Test of Patience
Starting asparagus from seed is, you know, a longer process, but it can be very rewarding, especially if you enjoy the whole growing journey. It takes more patience, as you won't get any harvest for at least three years, sometimes four. However, starting from seed often gives you a wider selection of varieties to choose from, including some heirloom types that might not be available as crowns. It's also usually less expensive to buy seeds than crowns, which is a consideration for some.
You’ll want to start asparagus seeds indoors, typically in late winter or early spring, about 10 to 12 weeks before your last expected frost date. Plant them in seed-starting mix, keeping the soil consistently moist. Once the seedlings are a few inches tall and have developed a good root system, you can transplant them into your garden bed. It’s a pretty delicate process, actually, at this stage.
Make sure to harden off your seedlings before planting them outside. This means gradually exposing them to outdoor conditions over a week or two, which helps them adjust to the sun, wind, and temperature changes. This step is, arguably, crucial for their survival once they move to their permanent home. You want them to be strong, you know, for the big move.
The Planting Process: Laying the Foundation
Once your soil is ready and you have your crowns or seedlings, it’s time for the actual planting. This step is quite specific for asparagus, so paying attention to the details here will really help your plants get off to the best possible start. It’s pretty much setting them up for a long, happy life.
Digging Trenches for Success
Unlike many other vegetables that go into individual holes, asparagus crowns are typically planted in trenches. Dig a trench about 12 to 18 inches wide and 6 to 8 inches deep. If you're planting multiple rows, space your trenches about 3 to 5 feet apart. This gives the plants plenty of room to spread out their roots and ensures good air circulation, which is, you know, quite important.
At the bottom of the trench, create a small mound or ridge of soil down the center. This mound is where you’ll spread the roots of your asparagus crown. The idea is to have the crown sitting on top of the mound, with its roots draped down the sides, like a little green umbrella. This helps the roots establish themselves properly and encourages strong growth. It’s a bit like creating a comfy bed for them, really.
Spacing Your Plants Just Right
Place your asparagus crowns on top of the soil mounds, spacing them about 12 to 18 inches apart within the trench. If you're using seedlings, you can plant them a bit closer, maybe 6 to 8 inches apart, as they are smaller to begin with. Make sure the crown or the top of the seedling is facing upwards, with the roots spreading out nicely.
Once the crowns are in place, gently cover them with about 2 inches of soil, just enough to barely cover the top of the crown. As the asparagus begins to grow and send up new shoots, you’ll gradually add more soil to the trench until it’s completely filled. This gradual filling helps to encourage strong root development and protects the young spears. It’s a rather clever method, actually, for building robust plants.
After planting, water the trench thoroughly. This helps to settle the soil around the crowns and provides much-needed moisture for the plants to begin their growth. You want to make sure the soil is moist, but not soggy, you know, just right. This initial watering is pretty important for getting them settled.
First Year Care: Nurturing Your Young Planta de Esparragos
The first year after planting your planta de esparragos is, arguably, the most critical for its long-term success. During this period, the plants are focusing all their energy on establishing a strong root system. It’s a bit like a baby growing its bones before it learns to walk, so to speak. Patience and consistent care are key here, honestly.
Watering Young Plants
Young asparagus plants need consistent moisture, especially during dry spells. You want to keep the soil evenly moist, but again, never waterlogged. Deep watering is better than frequent, shallow watering, as it encourages the roots to grow deeper into the soil, making the plant more resilient to drought later on. So, give them a good drink, rather than just a sprinkle.
Check the soil regularly by sticking your finger about an inch or two down. If it feels dry, it’s time to water. As the plants mature and the trench is completely filled, their watering needs might change slightly, but consistent moisture is always important, particularly during their active growing season. It's pretty much about listening to what the plant needs, you know?
Weeding: Keeping the Competition Away
Weeds are the arch-nemesis of young asparagus plants. They compete for water, nutrients, and sunlight, which can really hinder the development of your asparagus bed. So, keeping the area around your planta de esparragos free of weeds is absolutely vital, especially in the first year. This is, in fact, one of the most important tasks.
Hand-weeding is often the best method, as it avoids disturbing the shallow roots of the asparagus crowns. Be gentle when you pull weeds, trying not to pull up any asparagus shoots by mistake. Mulching can also help a lot with weed suppression, which we'll talk about next. It’s a rather simple step that makes a huge difference, honestly.
Ongoing Care for Established Asparagus Beds
Once your asparagus bed is established, typically after the first year, the care becomes a bit less intensive, but it’s still important to keep up with a few key practices to ensure continued productivity and health. Think of it like maintaining a very valuable long-term asset, you know? It still needs attention.
Feeding Your Asparagus Plants
Asparagus plants are pretty heavy feeders, meaning they need a good supply of nutrients to produce those delicious spears year after year. In early spring, before the new spears emerge, you can apply a balanced fertilizer or, even better, a generous layer of compost or well-rotted manure over the bed. This provides a slow release of nutrients as the plants begin their active growth.
Another feeding can be done after the harvesting season is over, usually in early summer, when the ferny foliage is allowed to grow. This helps the plants store energy in their roots for the following year's harvest. It’s basically like giving them a power-up for next season, which is pretty neat. You want them to be strong, you know, for the next round.
Mulching for Health
Applying a layer of organic mulch, such as straw, shredded leaves, or wood chips, around your asparagus plants offers several benefits. It helps to suppress weeds, which means less work for you, and it also helps the soil retain moisture, reducing the need for frequent watering. Mulch also helps to regulate soil temperature and adds organic matter to the soil as it breaks down over time.
A 2 to 4-inch layer of mulch is usually sufficient. Just be sure to keep the mulch a little bit away from the base of the spears to allow for good air circulation and prevent any potential issues with rot. It’s a fairly simple step that yields significant advantages for your planta de esparragos, seriously.
Dealing with Pests and Diseases
While asparagus is generally quite hardy, it can occasionally face issues with pests and diseases. One of the most common pests is the asparagus beetle. These small, colorful beetles can munch on spears and ferny foliage, and their larvae can also cause damage. Hand-picking them off the plants is an effective method for small infestations. For larger problems, you might consider organic insecticides, but always follow label instructions carefully.
Fungal diseases like asparagus rust can also be a problem, especially in humid conditions. Good air circulation and planting disease-resistant varieties can help prevent this. If you notice signs of disease, removing affected plant parts can sometimes slow the spread. Keeping your plants healthy and stress-free is, in fact, the best defense against most problems. A healthy plant is a happy plant, you know?
Winter Preparation for Your Asparagus Patch
As the growing season winds down and autumn arrives, your planta de esparragos will start to prepare for its winter dormancy. This is a very important time for the plant to store energy in its roots for the next year’s growth. It’s kind of like going into hibernation, you know, just a little.
Once the ferny foliage turns yellow or brown and dies back, usually after the first hard frost, it’s time to cut it down. Cut the old stalks back to about 2 to 4 inches above the ground. This helps to remove any potential overwintering sites for pests or disease spores, keeping your bed cleaner and healthier for the next spring. It’s a pretty simple cleanup job, really.
After cutting back the foliage, you can apply another layer of compost or well-rotted manure over the bed, followed by a fresh layer of mulch. This helps to protect the crowns from harsh winter temperatures and provides nutrients that will slowly break down and become available to the plants in the spring. It’s basically tucking them in for the winter, which is quite nice.
The Harvesting Joy: When and How to Pick
This is, arguably, the most exciting part of growing asparagus: the harvest! After all that waiting and care, finally getting to pick those tender spears is a truly special moment. But there are some important rules about when and how to harvest to ensure your plants stay productive for many years. You want to do it right, you know, to keep the good times rolling.
First Year: No Harvest Yet!
This is the hardest rule for new asparagus growers to follow: during the first year after planting crowns (or the first two to three years if starting from seed), you should not harvest any spears. Seriously, none. It's incredibly tempting when you see those first shoots emerge, but resist the urge! The plants need all their energy to establish a strong root system. Harvesting too early can weaken the plant and significantly reduce its long-term productivity. It's a bit of delayed gratification, but it's totally worth it.
Allow the spears to grow into tall, ferny foliage. This foliage collects sunlight and converts it into energy, which is then stored in the roots. This stored energy is what fuels the next year's harvest. So, letting them grow wild in the first year is, in fact, crucial for future abundance. It's like building up their savings account, you know?
Harvesting from Established Plants
In the second year after planting crowns (or the third/fourth year from seed), you can begin to harvest, but only for a short period, perhaps two to three weeks. In subsequent years, once the bed is truly established, you can typically harvest for about six to eight weeks, usually from late spring into early summer, depending on your climate. This is, you know, when the real fun begins.
Harvest spears when they are about 6 to 10 inches tall and have tight, compact tips. You can either snap them off at ground level with your fingers – they will naturally break where they are tender – or you can cut them with a sharp knife just below the soil surface. Be careful not to damage any emerging spears or the crown itself when you're cutting. It's a rather delicate operation, actually.
Continue harvesting all spears that emerge during the harvest period, regardless of their size. This encourages the plant to produce more. When the spears start to become thinner, or if the weather gets very hot, it’s time to stop harvesting. This signals to the plant that it’s time to let the remaining spears grow into ferny foliage to replenish the root reserves for the next year. It’s basically giving the plant a well-

21 Plantas ROSAS con mucho estilo: Nombres y cuidados
Tipos de plantas
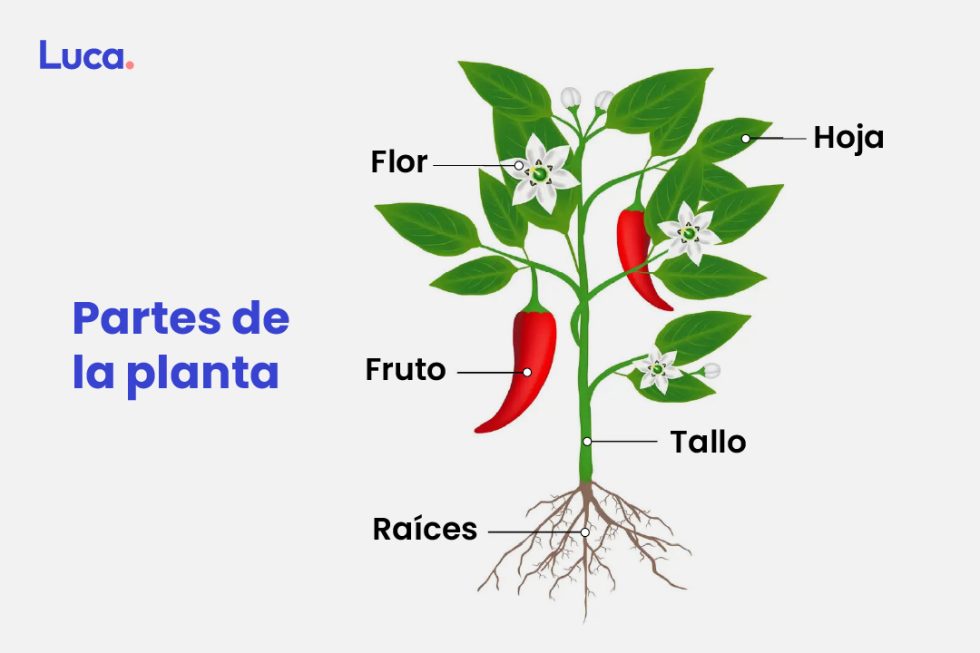
Qué son las plantas y cómo se clasifican | Plataforma Educativa Luca
